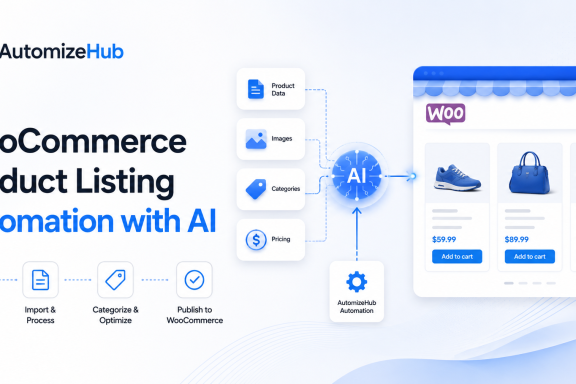
If you want to understand the business use case first, read our guide on WooCommerce product listing automation with AI. A WooCommerce product listing AI agent can create product pages in WooCommerce without doing every step by hand.
It can read product data from a Google Sheet, database, API, or internal tool. Then it can prepare product content, upload files, set prices, select categories, add images, and create WooCommerce product drafts.
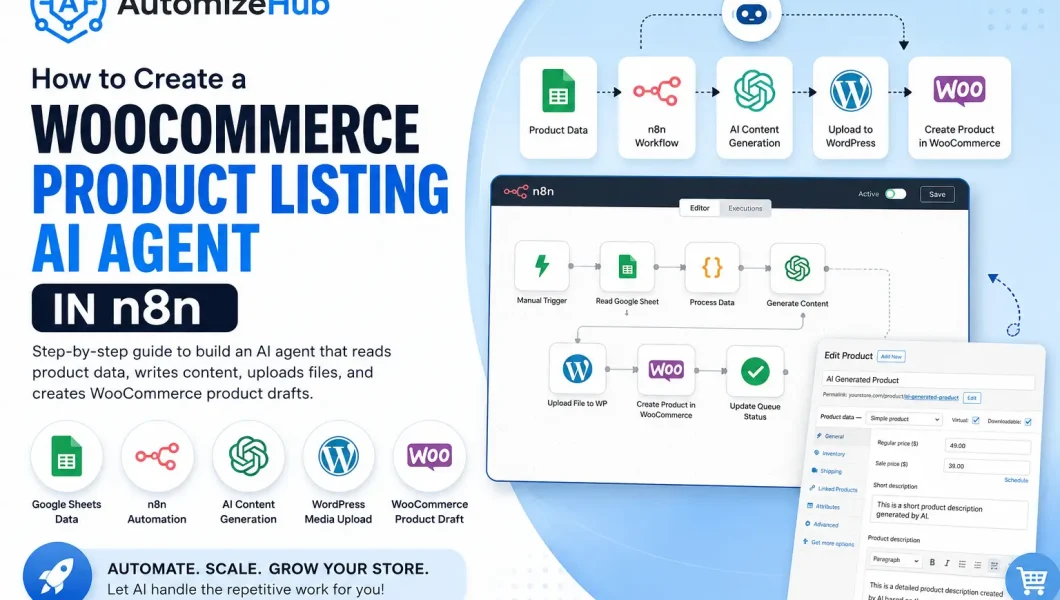
This guide will show you how to create a WooCommerce product listing AI agent in n8n.
If you want to understand the business use case first, read our guide on WooCommerce product listing automation with AI.
What This AI Agent Will Do
This AI agent will help you turn product data into WooCommerce product listings.
The workflow can do these tasks:
- Read product data from a sheet or API
- Check which products are pending
- Apply product rules
- Choose the right category
- Choose the right product image
- Create product title and description with AI
- Upload product files to WordPress Media
- Create a WooCommerce product
- Save the product link back to the sheet
- Mark the product as done or failed
This is useful when your team has many products to create and does not want to copy and paste the same data again and again.
Tools You Need
To create this automation, you need a few tools.
- n8n for workflow automation
- WooCommerce store
- WordPress admin access
- WooCommerce REST API keys
- Google Sheets or another data source
- OpenAI API key or another AI model
- Product images or image media IDs
- Product files if your product is downloadable
You do not need to follow the exact same setup for every business. You can change the data source, product fields, and rules based on your store.
Simple Workflow Overview
Here is the simple flow:
- Start the workflow
- Read settings from Google Sheet
- Read product queue
- Find pending products
- Prepare product data
- Get or create product file
- Upload file to WordPress Media
- Ask AI to create product content
- Create product in WooCommerce
- Update the queue status
This keeps the full process clear and easy to track.
Step 1: Create Your Google Sheet
First, create a Google Sheet that will control your automation.
You can create these tabs:
- Config
- Product_Queue
- Media_Map
- Price_Rules
- Woo_Categories
- Logs
This sheet will act like a control panel for your AI agent.
Config Sheet
The Config sheet stores basic settings.
| Key | Value | Use |
|---|---|---|
| wp_base_url | https://yourstore.com | Your WordPress website URL |
| wp_username | your username | WordPress user |
| wp_app_password | your app password | WordPress app password |
| woo_consumer_key | your key | WooCommerce API key |
| woo_consumer_secret | your secret | WooCommerce API secret |
| openai_api_key | your AI key | Used to create content |
| wp_product_status | draft | Create products as draft first |
| process_limit | 2 | How many products to process in one run |
For safety, create products as drafts first. After review, you can publish them.
Product Queue Sheet
The Product_Queue sheet stores all products that need to be created.
You can use columns like:
- product_key
- product_name
- category
- regular_price
- sale_price
- image_media_id
- file_url
- short_description
- description
- seo_title
- seo_description
- focus_keyword
- woo_product_id
- woo_product_url
- status
- error_message
- created_at
- updated_at
- processed_at
The status column is very important.
You can use these status values:
- pending
- processing
- done
- failed
Media Map Sheet
The Media_Map sheet helps the automation choose product images.
For example, if a product belongs to one category, the system can use one image. If another product belongs to another category, it can use another image.
You can keep it simple:
| map_type | category | media_id | priority |
|---|---|---|---|
| category | Digital Products | 123 | 10 |
| default | 100 | 1 |
Price Rules Sheet
The Price_Rules sheet helps the automation select prices.
You can use fixed prices, category-based prices, or custom rules.
| rule_name | regular_price | sale_price |
|---|---|---|
| Default | 49 | 39 |
Woo Categories Sheet
The Woo_Categories sheet maps your product data to WooCommerce category IDs.
| map_type | category | woo_category_id | priority |
|---|---|---|---|
| category | Digital Products | 25 | 10 |
| default | 20 | 1 |
You can find WooCommerce category IDs inside WordPress admin or by using the WooCommerce API.
Read Also: Building Agentic AI Applications With a Problem-First Approach
Step 2: Create WooCommerce API Keys
Now create WooCommerce API keys.
Go to your WordPress admin area.
- Go to WooCommerce
- Open Settings
- Go to Advanced
- Open REST API
- Create a new key
- Set permission to Read/Write
- Copy Consumer Key and Consumer Secret
Add both values to your Config sheet.
Keep these keys private. Do not add them inside blog posts, screenshots, or public files.
Step 3: Create a WordPress App Password
The automation also needs to upload files to WordPress Media.
For this, you can use a WordPress app password.
- Go to WordPress Users
- Open your user profile
- Find Application Passwords
- Create a new app password
- Copy it safely
Add this app password to your Config sheet.
This helps n8n upload files to your WordPress Media Library.
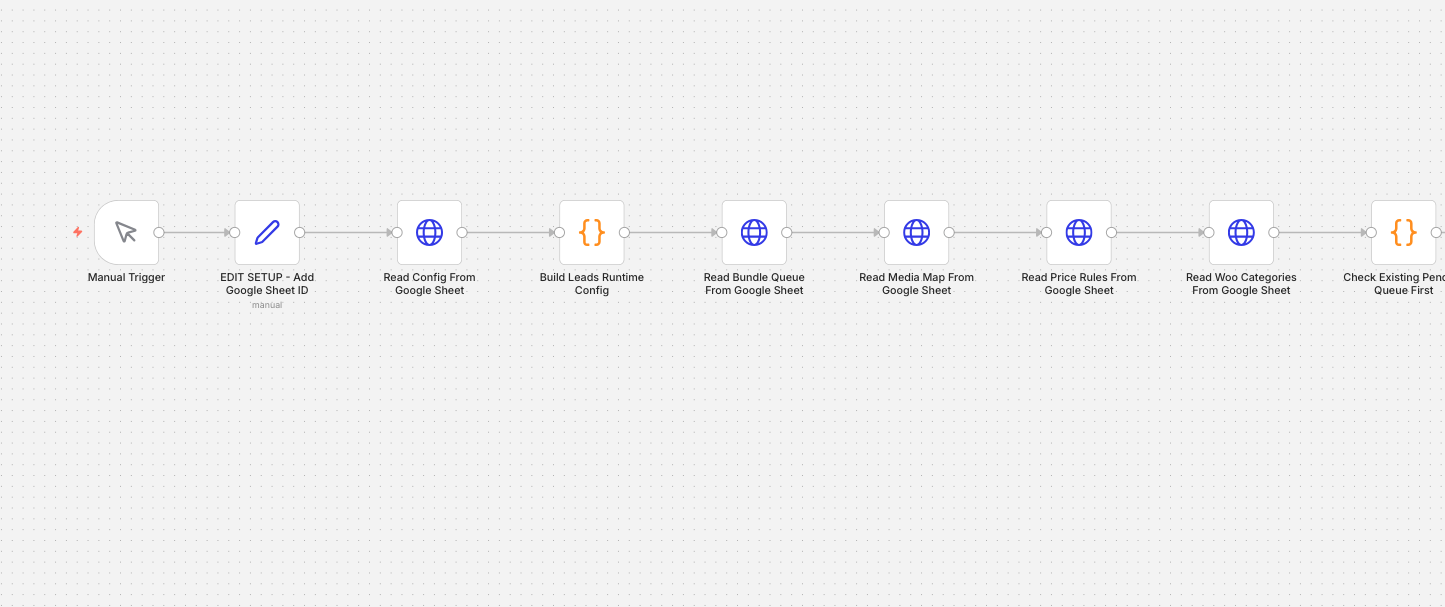
Step 4: Start the n8n Workflow
Now open n8n and create a new workflow.
Add a Manual Trigger node first.
This lets you test the workflow before making it automatic.
Later, you can replace the Manual Trigger with a Schedule Trigger, webhook, or form trigger.
Step 5: Add a Setup Node
Add a Set node after the trigger.
This node should store your Google Sheet ID and sheet names.
Example fields:
- spreadsheetId
- configSheetName
- queueSheetName
- mediaMapSheetName
- priceRulesSheetName
- wooCategoriesSheetName
- logsSheetName
- timezone
This keeps the workflow clean. If you change your sheet name later, you can change it in one place.
Read Also: How to Build an AI Agent That Checks Your Website Daily (Without Manual Work)
Step 6: Read Config From Google Sheet
Add an HTTP Request node to read the Config sheet.
This node should read all key-value rows from the Config tab.
Then add a Code node to convert those rows into a clean config object.
This code should check required values like:
- WordPress base URL
- WordPress username
- WordPress app password
- WooCommerce consumer key
- WooCommerce consumer secret
- AI API key
If any important value is missing, the workflow should stop and show a clear error.
Step 7: Read Product Queue and Mapping Sheets
Now add nodes to read these sheets:
- Product_Queue
- Media_Map
- Price_Rules
- Woo_Categories
These sheets help the workflow decide what product to create, which image to use, which category to select, and which price to add.
This is better than hard-coding rules inside n8n.
Your team can update rules in Google Sheets without editing the workflow every time.
Step 8: Check Existing Pending Products First
Before getting new data, the workflow should check if there are already pending products in the queue.
This is important.
If the workflow always pulls new data first, old pending products may stay stuck.
So the system should first check:
- Is status pending?
- Is status failed?
- Is product ID blank?
If yes, process those rows first.
If no pending rows exist, then the workflow can pull new product data from your API, database, or another source.
Step 9: Pull New Product Data
If the queue is empty, the workflow can get new product data.
This data can come from:
- Internal API
- Google Sheet
- Database
- CRM
- ERP
- Another business system
Keep the data generic and clean.
Every product should have one unique key. This key helps the workflow avoid duplicate products.
Step 10: Prepare Missing Queue Rows
After new data is received, add a Code node to prepare queue rows.
This node should:
- Create a unique product key
- Check if the product already exists in the queue
- Add category data
- Add product count or product details if needed
- Apply price rules
- Select product image
- Select WooCommerce category
- Set status as pending
After this, append only new rows to the Product_Queue sheet.
This step helps prevent duplicate products.
Step 11: Select Pending Products for Processing
Now read the queue again.
Find rows where:
- Status is pending, failed, or blank
- WooCommerce product ID is blank
Then process only a small number of rows in one run.
For example, process 2 or 5 products at a time.
This keeps the workflow safe and reduces timeout problems.
Step 12: Mark Products as Processing
Before creating products, update the selected rows to processing.
This prevents the same product from being picked again in another run.
Also update these fields:
- selected image ID
- WooCommerce category ID
- regular price
- sale price
- updated time
- error message blank
This makes the queue easy to read and debug.
Step 13: Split Products One by One
Add a Split in Batches node.
This lets the workflow process one product at a time.
Processing one by one is safer because each product may have files, images, AI content, and API calls.
Step 14: Prepare the Product File
If your product is downloadable, prepare the product file first.
The file can come from:
- API export
- Existing file URL
- Cloud storage
- Internal system
The workflow should get the final file URL or binary file.
If the product is not downloadable, you can skip this step.
Step 15: Upload File to WordPress Media
If you have a downloadable file, upload it to WordPress Media.
Use an HTTP Request node.
The request should send the file as binary data to the WordPress Media endpoint.
After upload, WordPress will return:
- Media ID
- Media URL
Save these values because WooCommerce will need the file URL.
Read Also: How to Build an AI Agent That Checks Your Website Daily (Without Manual Work)
Step 16: Generate Product Content With AI
Now ask AI to create product content.
The AI prompt should be simple and clear.
Give it product data like:
- Product name
- Product type
- Category
- Price
- Features
- Use case
- Target customer
Ask AI to return only clean JSON.
Example output:
{
  "product_title": "Product Title Here",
  "short_description": "Short product summary here.",
  "description": "Full product description here.",
  "seo_title": "SEO title here",
  "seo_description": "SEO description here",
  "focus_keyword": "focus keyword here"
}
This makes the output easy for n8n to read.
Also add a fallback. If AI fails, the workflow should still create a simple title and description from the product data.
Step 17: Build the WooCommerce Product Payload
The product payload is the data that will be sent to WooCommerce.
It can include:
- Name
- Product type
- Status
- Regular price
- Sale price
- Description
- Short description
- Categories
- Images
- Attributes
- Downloadable file
- Custom meta fields
For safety, use draft status first.
Example product settings:
- Type: simple
- Status: draft
- Virtual: true if it is a digital product
- Downloadable: true if it has a file
You can also save SEO fields as product meta data. This makes it easier to use later with your SEO plugin or custom setup.
Step 18: Create Product in WooCommerce
Now send the product payload to WooCommerce using an HTTP Request node.
The request should go to the WooCommerce product endpoint.
Use Basic Auth with your WooCommerce consumer key and consumer secret.
If the request is successful, WooCommerce will return:
- Product ID
- Product link
- Product status
Save these values back to your queue sheet.
Step 19: Update the Queue Row
After the product is created, update the same row in your Product_Queue sheet.
Save these fields:
- WooCommerce product ID
- WooCommerce product URL
- Product title
- Short description
- Description
- SEO title
- SEO description
- Focus keyword
- Media ID
- File URL
- Status as done
- Processed time
- Updated time
This gives your team a clear record of what was created.
Step 20: Add Error Handling
Error handling is very important in automation.
Many things can fail:
- Google Sheet access
- API response
- File upload
- AI response
- WooCommerce product creation
- Missing category ID
- Wrong image ID
- Invalid product price
If something fails, do not hide the error.
Save the error message in the Product_Queue sheet.
Set the status to failed.
This helps your team fix the issue and run the workflow again.
Step 21: Test With One Product First
Do not test with 100 products first.
Start with one product.
Check these things:
- Did the workflow read the product row?
- Did it select the right category?
- Did it select the right image?
- Did AI create clean content?
- Did WordPress upload the file?
- Did WooCommerce create the product?
- Was the product created as draft?
- Was the queue updated?
After one product works, test 5 products.
After that, increase the process limit slowly.
Step 22: Review the Product Draft
Open the WooCommerce product draft.
Check:
- Product title
- Product description
- Short description
- Price
- Category
- Product image
- Downloadable file
- SEO title
- SEO description
If everything is correct, you can publish the product.
Later, once the system is fully tested, you can allow the workflow to publish products automatically if your business needs that.
Read Also: How to Monitor SSL Expiry in n8n with Telegram (Step-by-Step Guide)
Best Practices for This AI Agent
Keep products as draft first
This keeps your store safe while testing.
Use unique product keys
A unique key helps prevent duplicate products.
Use clear sheet columns
Do not keep messy data. Clean data gives better automation results.
Process small batches
Small batches are easier to debug.
Keep private keys outside public screenshots
Never show API keys, app passwords, private URLs, or secret values.
Add fallback content
If AI fails, your workflow should still create basic content or mark the row as failed.
Save status after every big step
This helps you understand where the workflow stopped.
Common Problems and Fixes
Product is not created
Check WooCommerce API keys, product endpoint, and required fields.
File is not uploaded
Check WordPress app password, media endpoint, file type, and file size.
Wrong category is selected
Check your Woo_Categories sheet and category IDs.
Wrong image is selected
Check your Media_Map sheet and media IDs.
AI content is not clean
Improve your prompt and ask AI to return only JSON.
Duplicate products are created
Check your unique product key and queue check logic.
When Should You Use This Automation?
You should use this automation when:
- You have many products to upload
- Your product data is already in a sheet or system
- Your team spends too much time copying and pasting
- You sell digital products or downloadable files
- You need product pages with SEO fields
- You want a clean product creation process
This automation is helpful for ecommerce stores, digital product sellers, agencies, suppliers, and businesses with large product catalogs.
Final n8n Workflow Structure
Your final workflow can look like this:
- Manual Trigger
- Setup Google Sheet details
- Read Config sheet
- Build runtime config
- Read Product Queue
- Read Media Map
- Read Price Rules
- Read Woo Categories
- Check existing pending queue
- Get new product data if needed
- Prepare missing queue rows
- Append new queue rows
- Read queue for processing
- Prepare pending products
- Save processing status
- Split products one by one
- Prepare file or export file
- Download file if needed
- Upload file to WordPress Media
- Generate content with AI
- Create WooCommerce product
- Update queue row
- Loop next product
This structure gives you a safe and trackable AI product listing system.
Can AutomizeHub Build This for You?
Yes. At AutomizeHub.ai, we build custom AI agents for real business workflows. We can help you connect your data source, AI model, n8n workflow, WordPress, WooCommerce, CRM, database, or any internal system.
We can build automation for:
- WooCommerce product listing
- Shopify product listing
- Digital product upload
- Report creation
- CRM data entry
- Lead routing
- File processing
- Business dashboard updates
- Custom AI workflows
If your team is doing the same task again and again, an AI agent can save time and reduce manual work.
Contact AutomizeHub.ai to build a custom AI agent for your business.
FAQs
What is a WooCommerce product listing AI agent?
A WooCommerce product listing AI agent is an automation system that creates WooCommerce product pages from your data. It can write content, add prices, select categories, upload files, and create product drafts.
Can I create WooCommerce products from Google Sheets?
Yes. You can use n8n to read product data from Google Sheets and send it to WooCommerce using the WooCommerce API.
Can AI write product titles and descriptions?
Yes. AI can create product titles, short descriptions, full descriptions, SEO titles, meta descriptions, and focus keywords from your product data.
Can this workflow upload downloadable files?
Yes. The workflow can upload files to WordPress Media and attach them to WooCommerce downloadable products.
Should products be created as draft or published?
Draft is safer for testing. Once the workflow is fully tested, you can choose to publish products automatically if your business needs it.
Can this AI agent work with APIs instead of Google Sheets?
Yes. The AI agent can read product data from an API, database, CRM, ERP, or any other internal system.
Can AutomizeHub.ai build this automation?
Yes. AutomizeHub.ai can build a custom WooCommerce product listing AI agent in n8n based on your business workflow.

No Comments